Well, it’s been a while since I’ve posted anything new so I wanted to fill you in on what I’ve been up to over the cold winter months.
Of course, I’ve been staying up with my gym routine although it’s slacked a bit during December. Swimming has gotten progressively better and I am focused on improving stroke, breathing, and efficiency. But of my main concerns was how to stay in shape for the cycling season when it was too cold or bad outside to actually ride.
I tried and tried to get used to the stationary/spin bikes at the gym, but they just don’t feel right. I guess my Trek has spoiled me. I adjusted the seat, the handlebars, everything, just couldn’t make it work for me. Then there was the idea of riding in the cold, I mean the really cold, cold. No thanks. Not only is it detrimental to your goals, if it’s too wet, icy, or snowy, it could be downright dangerous. The solution was an indoor bike trainer.
These ingenious devices allow you to mount your high-quality road bike into the bracket and the rear tire against a variable resistance wheel to simulate different levels of effort on a typical ride. Yes, there are probably hundreds of articles and videos out there from the greatest of the great, of which I am not. But, learning all of this on my own, with no help from the outside world other than doing research on equipment and methodology, I hope I can help you get where you want to go – even if you’re standing still!

Equipment
The trainer. It’s important to choose the right indoor trainer unit for your needs and they come in a wide variety of styles and function.
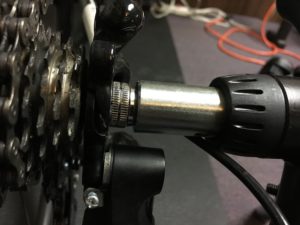
You’ll need to exchange the rear skewer (that shaft that goes inside the rear wheel hub that makes it a quick-disconnect) for the one that comes with the trainer. It’s got special outer hubs designed to fit on the locking pins of the trainer.
I chose the CycleOps, Magneto trainer. It’s lightweight, durable, has a lifetime warranty, and connects with manufacturer’s virtual training system. For less than $300, I now have a professional, high-quality trainer perfect for my type of riding. You may want something more robust, so do your homework.
One thing that concerned me was leaving the bike in the trainer for long periods of time – in my case for most of two months. I did what anyone with my marketing experience would do – I took to Twitter. I found the CycleOps and Trek Twitter accounts (@CycleOps and @TrekBikes) and sent a message to both asking if it would harm the bike’s mechanics to leave it in the trainer. Both responded, but CycleOps took things a few steps farther, asking for specific photos to make sure I had the bike mounted properly. Thankfully, they approved of my setup and assured me it’s fine to leave the bike in the brackets. I would, however, recommend relieving the pressure on the rear tire by disengaging it from the trainer wheel when not in use.

Safety gear. Believe it or not, you don’t need a helmet when you ride indoors! I know, sounds idiotic – believe me, it is. But, I actually saw a few videos online where the people riding on a trainer were wearing helmets. Were they prone to falling off the bike and hitting their heads on a wall or floor or something?
Still, you need to be careful. If your bike uses clip pedals and shoes, keep using them. Be cautious when getting off and on the bike – remember you can’t tip it over to step on like you can when you’re riding normally. It’s in a fully upright position. So you’ll need to step up, clip in, and swing a leg over and clip the others side after you get settled.
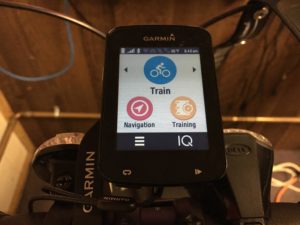 Tracking your efforts. Since you’re mounted there in the trainer and not really going anywhere, you need more than GPS to help you track your activity. You’ll have to invest in some high-tech hardware to give your exercise app something to record. After the holidays, I made it a mission to purchase two things – a trainer and a cycling computer, specifically, a Garmin Edge 820.
To keep good track of your time, you’re going to need, at the very least, an app for your smartphone, or a cycling computer, something like my Garmin, a cadence sensor (for the crank) and a speed sensor (for the back wheel hub). By choosing to invest in a cycling computer in a bundled kit (around $500), I had everything in one box, the computer, mounting equipment, both sensors, and a heart rate monitor strap. Most units have a smartphone app for entering details and reviewing your workout records.
Here’s a screenshot of the Garmin app I am using …

Media. I’m a sensory-driven person, so I wanted some kind of screen to watch with either a scenic tour or a guided workout routine. One of the great things about cycling is how readily available the indoor media. From DVDs and downloads to free YouTube cycling tour videos, there is a nearly unlimited library available to the indoor rider.
My go-to for guided cycling workouts has been the Global Cycling Network series available for purchase streaming or DVD, or free to Amazon Prime Video members. They offer a variety of interval workouts, varying intensity, with timer and effort graphics and visuals of others doing the same workouts in the studio during filming. The workouts range from 20 minutes to more than an hour and simulate everything from low-effort warm up and cool down to steep climbs.
For cruising rides, where I just want scenery with no coach or video metrics, there are dozens of choices on YouTube, from a jaunt through the streets of New York, to a ride along the San Francisco Bay. But I also invested in a DVD series of cycling tours in the English countryside of Cornwall. VitaDVDs.com offers a wide selection of relaxed cycling tours of England and Europe. Click for a sample from their YouTube channel. The DVDs are inexpensive, about $12, and they have a less costly, downloadable option as well.

The video screen is mounted right in front of the bike. I’m using a small, 22″ smart/dvd player TV right now, but I’ll eventually upgrade that to a larger screen and DVD player.
******
Here are some of my favorite cycling workout videos:
Pre-designed, guided workout videos
******
My Process
Trying to figure out how to be productive – and practical – about all of this I needed to come up with a plan. I have discovered that a couple of the scenic, self-motivated rides and a few directed, high-intensity, guided workouts seem to make a good mix. Setting up a regular schedule worked best, a few days a week, alternating ride types,
A few more tips …
Be sure to fortify and hydrate! Stationary riding might make you feel like you’re not using as much energy but that is incorrect. You’re burning calories and losing fluids just like any other ride.
Put a mat under your trainer setup. The floor in my workout room is tile so some equipment might scoot around a bit when in use. A rubber mat under the bike while on the trainer will help keep it from moving. Also, be sure to use the front wheel block with your trainer. It may not come with one, but it’s worth the investment, it keeps the front of the bike level with the back and more stable.
This is very basic information, but it’s a start. I’ll keep everyone posted on how I’m doing. If you have suggestions I can pass along to readers, feel free to email – geryldeer@gmail.com and put “OLD NERD” in the subject line! Thanks!